





Having a unique product catalogue is one of the best ways to scale beyond your fellow marketers. Most product catalogues follow this process: pull out the phone, prop the item on a table or a bedsheet, snap a few shots, and upload. While this process is one of the fastest ways to get a listing live, for sellers, it has some issues because product photos aren’t just decoration on a listing page. They’re often the entire pitch even before you say a word or customers read a text.
The problem with phone-only product shots
Yes, phone cameras are good at capturing a moment. But they are not built to shoot product photos and videos. A professional product image needs even, shadow-free lighting; clean, sharp edges; accurate colour; and resolution.
A few things go wrong consistently with phone-shot product images:
- Inconsistent lighting. Indoor lighting casts warm or cool tints your camera tries to auto-correct, often unevenly across the frame.
- Soft focus and noise. Phone-shot videos/images pick up motion blur or grain, especially indoors, especially when shot without a tripod or a wide aperture.
- Compression loss. Every time an image is uploaded, resized, or re-saved, it loses a bit more detail — so what looked sharp on your phone screen can look muddy on a storefront.
None of this means the photo is unusable. It means it’s unfinished. And an unfinished-looking photo reads to a shopper as an unfinished-looking business — even if the product itself is great.
Why this actually affects conversion, not just aesthetics
It’s tempting to file image quality under “nice to have”; in practice, it’s closer to a trust signal. Shoppers can’t touch your products; the photo must do what a showroom or a sales assistant would do. Therefore, product image must prove that the item is real, well-made, and worth the price tag.
Note that shoppers don’t stop to think “a good product with a bad photo when the listing photo looks soft, poorly lit, or oddly colored. They rather scroll past. That’s lost conversion you never see in your analytics as a “cause.” It just shows up as a lower click-through or add-to-cart rate on that listing versus a competitor’s.
The upside is that this is one of the few conversion levers a small seller can pull without spending on ads or dropping price. It’s a workflow fix, not a budget fix.
What the fixed workflow actually looks like
You don’t need to replace your phone with a camera rig. Add one extra step between “shoot” and “publish.” Some of the best ways to do this are:
- Shoot deliberately with what you have: Use natural, indirect light where possible, keep the background plain, and take a few extra angles.
- Pick your sharpest shot: Don’t fix a genuinely bad photo; pick the best image.
- Run it through an enhancement tool: enhancing your photos closes the gap between “phone photo” and “listing-ready photo.”
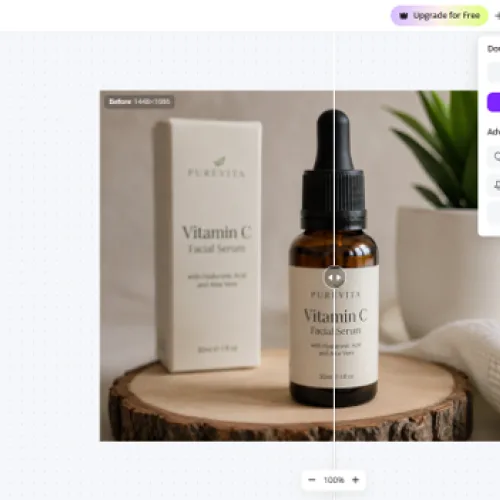
This is where a tool like Zawa fits in. Zawa AI is built around the phone-to-professional gap for small businesses: it takes a basic product photo and cleans up focus, lighting, and colour without requiring any editing skill, so the step above takes minutes instead of a trip to a photographer.
Before

After

Tools that actually solve this
Two specific fixes cover most of what goes wrong with phone product shots:
When the shot is fine but soft, noisy, or off-colour — this is the more common case, where the photo is basically usable but needs cleanup. An image enhancer is built for exactly this: upload a photo, and it automatically corrects sharpness, reduces noise, and balances colour. For a product shot, this alone is often the difference between a listing that looks amateur and one that looks store-ready.
When the file itself is too small or low-resolution to use — this happens when a photo was taken at low resolution, cropped tightly, or heavily compressed somewhere along the way, and now looks pixelated when displayed at listing size. Here, you need to convert the image to HD — converting the file up to a usable resolution — which is what a tool like Zawa’s HD photo converter does: it upscales the image while rebuilding detail, rather than just stretching the existing pixels.
This is what sharpening visuals with Zawa AI looks like:
Step 1: Open the tool and upload a product image

Step 2: Choose definition, then tap the “Enhance” button

Step 3: Review and download the enhanced image
The takeaway
You don’t need a sophisticated studio, lighting kit, or professional photographer to get product photos that convert. You need a phone, a bit of intention in how you shoot, and one extra step before the photo goes live. Build that step into your workflow once, and it stops being a task — it just becomes part of how you list a product.
Comments
Start the conversation about this story.